

Table of Contents
There are a lot of different dog training tools on the market these days. It can be overwhelming to figure out which ones you need and how to use them effectively. This article will provide some resources for getting started with the most popular dog training tools. We will also provide tips for using these tools effectively so that you can train your dog quickly and easily!
Some of the videos below require more advanced skills; I’m sharing them with you, so you have a reference for unexpected circumstances. Please take some time to look through this info; you will be much more confident using these tools.
Containment Tools:
Containment means keeping your dog away from certain areas or objects to prevent any unwanted behaviors. This can include using leashes, baby gates, crates, and other physical barriers to limit a dog’s movement and access to potential problems.
Learn more about proper management and containment techniques using leashes, crates and “place” click Here.
Elevated Bed “Place”:

An elevated bed is a cot-like structure that raises your dog off the ground. It is an excellent tool for training your dog to stay in one Place or to stay calm when guests come over. The elevated bed provides a safe place for your dog to relax or sleep.
This is a multi-beneficial way to advance from a “Down” command to be able to send them to a location to do a “Down” or any other command you choose. Place is an excellent command to help dogs with reactivity, separation anxiety, or any dog that is just learning manners and needs to be in a calm state more often.
We will use this command to create a calm state of mind, an “off switch,” instead of continuously telling your dog what to do or correcting it for unwanted behaviors. The goal is to train your dog to a “Place” so that they will remain calm around unpredictable distractions. You can use this command to send your dog to a fabric (previously put on a bed) or other elevated objects anywhere and exist in a quiet and calm state of mind.
How to teach Place:
Take your time with teaching this; it is an advanced command. It is fulfilled when the dog has all paws on the surface; for most dogs with behavior issues, we also require that it does a “Down.”
- Step 1- Use a treat to lure the dog onto the “place” (doggy bed, blanket, mat). The first few repetitions give rewards for putting any amount of paws on it (even just one leg). Guide the dog to come back to you and away from it.
- Step 2– As you lure them back to the elevated bed. Incrementally aim to have all four paws on it; repeat a few times. Practice adding the three D’s to this exercise and getting distance away from the dog before moving to step three. If they get off, guide them back on with the leash and try again. Be sure to reward them with treats when they stay longer.
- Step 3 – Ideally, for dogs with severe behavioral issues, you’ll want to require a down on the elevated bed before it rewards the dog. If this is too much, continue to work on step two and try again in a few days.
- Step 4– Now, you will start to ask for the behavior without luring with the treat. Say “Place” as your dog is getting on the elevated bed; if they don’t go all the way, guide them with your leash until so.
Leashes and “Tie-Backs”
This Protocol is a step-by-step breakdown using my process and formulas “The 3C’s, 3E’s and 3C’s”, Teaching your dog to stay calm or in a neutral state of mind. I have used this protocol with over 100 dogs with anxiety and reactive issues. This protocol can also be used with any command. It is a very logical, stress-free manner that is a helpful guide for teaching, measuring, and advancing your dog’s level of communication.
The one tool we’ll have to use with our dogs every day is the leash (preferably slip leash for walks and multi use leashes for “tie-backs”), it’s essential to have multiple to choose from to fit your lifestyle. I recommend a six-foot leash for most dogs. Leashes help keep our dogs safe and under control when we’re out walking, running, or hiking. They also provide a way for us to connect with our dogs and build trust.
Many different types of leashes are available on the market, from standard nylon leashes to retractable leashes to hands-free ones. I recommend trying a few different types to see what works best for you and your dog.
If you live in an urban area, you may consider a shorter leash, such as a four-foot leash, to keep your dog close to you. A shorter leash will also be easier to control if your dog is reactive or tends to pull on the leash.
If you live in a rural area or love to hike, a longer leash, such as an eight-foot or ten-foot leash, may be a better option. A longer leash will give your dog more freedom to explore while keeping them under control.
Other than using the leash to walk with your dog, you can use it to tether them to secure objects in different locations around the house and outside, otherwise known as the “Tieback”. This is one of the best practices for your puppy or new dog.
Learn more about proper management and containment techniques using leashes, crates and “Place” click Here.
“Protocol for Relaxation”

Keeping your dog calm and content in a crate, on “Place,” or under any command during highly stimulating situations can be overwhelming for everyone involved. The key to getting your dog to stay put goes beyond issuing commands. It’s about cultivating a strong, distraction-resistant behavior through consistent repetition and patience.
Most dogs will go to their Crate or “Place” on command after a few short training sessions; however, it will not be distraction-proof until many (100- 500) successful repetitions are done. For the first weeks, give the command “place” ONLY when the behavior wanted is predictable or you are capable of physically guiding your dog to the bed.
This Protocol is a step-by-step breakdown using a similar process to my formulas “The 3C’s, 3E’s and 3C’s”, Teaching your dog to stay calm or in a neutral state of mind. I have used this protocol with over 100 dogs with anxiety and reactive issues. This protocol can also be used with Tie-backs, Crate, “Place” or with any command. It is a very logical, stress-free manner that is a helpful guide for teaching, measuring, and advancing your dog’s level of communication.
This is the simplified version Protocol for Relaxation By Dr. Karen L. Overall.
For those of you training a high-anxiety dog or just looking to level up your understanding of animal behavior modification. This advance version of the “Protocol for Relaxation” has deeper insights into animal behavior modification.
Dog Clicker Training

Owners can use clickers in the same way we use learning markers; you can use both together or separately. A clicker is a small, handheld device that makes a “clicking” sound when pressed. The clicker is used as a marker to signal your dog that they have done something correctly and will be rewarded.
Clicker training is a great way to train your dog in new behaviors and tricks, and it’s also a great way to bond with your dog. Clicker training is based on the principles of operant conditioning, which means that your dog will learn to associate the clicker sound with a positive reinforcer, such as treats or praise.
I prefer to use vocal markers over clickers when training. However, depending on the training situation, the behavior, or the trick, I will also use a clicker at the same time as my vocal markers, so dogs don’t get confused as I explain to people what I am doing.
The benefit of a clicker is that there is no change of emotion, tone, or pitch; it is binary. Clickers are used the same way vocal markers are, to teach a dog that they are on the right track, “Good,” “Yes,” and “Get it.”
The clicker is clicked :
- Once as a “Good” (continue what you are doing to get a reward)
- As a “Yes,” use three or more clicks (great job, come to me for a reward).
Tips to remember:
- Food rewards should be provided after the marker (vocal or clicker) rather than during.
- “Uh-uh” is a negative marker, meaning you are not on the right track. (Do not punish dogs, incredibly, when they aren’t fulfilling a new behavior.)
- Touch is a target command/request; it can be used to move around with precision and avoid unnecessary leash pressure.
Dog collars:
Ass with leashes, there are many different collars to choose from for your dog. And like leashes, it’s crucial to find the right fit for you and your dog. The most common dog collars are flat collars, martingale collars, and prong collars.
Flat collar (regular collar)

keeps the tags and identification secure. It isn’t recommended for walking dogs due to the damage it can inflict on their neck, and because out of any collars, it promotes an “oppositional reflex” the most.
Martingale collars:

A martingale collar is a type of flat collar that tightens when pulled, but not to the point of constriction. It was initially made for sighthounds because their necks are often larger than their heads, so that a regular flat collar would slip right off. They have an extra loop that cinches up snugly around the neck when pulled, but not so tight that it would choke the dog. This is a very efficient tool when wanting to use leash pressure for communication.
Prong collars:

A prong collar is a type of collar that has blunt prongs that point inwards towards the dog’s neck. Prong collars should only be used under the supervision of a certified trainer, as they can be misused—one of the favorite dog walking tools for professional dog handlers. As barbaric as it may look, it is one of the safest collars for walking with a dog. It is like “power steering” for walking. It is meant to use for guiding a dog, not to punish continuously. This takes time but is by far the most effective tool for managing reactive, dangerous, and easily distracted dogs on walks until they have gone through sufficient behavioral training.
Slip Lead:
A slip lead is a leash with a ring or fabric on one end that slides up and down the leash, making it adjustable. It also has a loop on the other end that goes over the dog’s head. A slip lead is often used when walking trained dogs and in dog sports such as agility, flyball, and treibball. It can be used with untrained dogs as long as you stay in a safe environment to teach advanced behaviors.
Head collars:
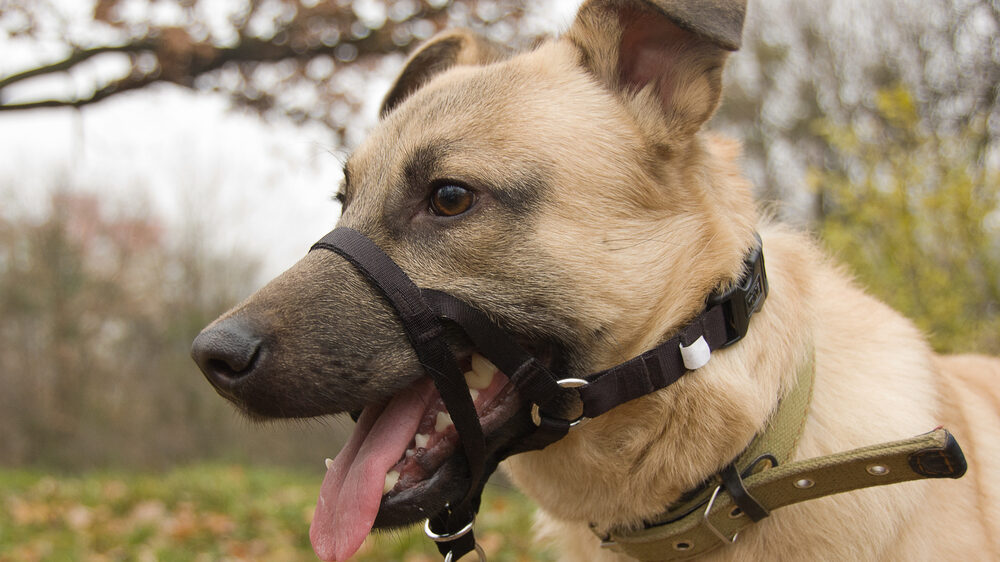
Head collars are designed to go over your dog’s muzzle and around their head, similar to how a halter goes on a horse. The most common type of head collar is the gentle leader. Head collars can be very effective in dogs that pull on walks, yet it doesn’t provide much range for communication. It is often the tool most dogs have the most challenging time with when starting out.
Retractable Leash:

A retractable leash is a leash that is attached to a handle that has a ratcheting device, which allows the dog to move away from or closer to the handler while on walks. It’s important to note that not all retractable leashes are created equal, and some can be very dangerous if not used correctly. We recommend primarily used in it with trained dogs or only with untrained dogs to practice Recall and leash pressure cues.
E-Collar:

An e-collar is a type of collar that uses a remote to deliver electrical stimulation to the dog’s neck. It is often used in conjunction with previous training and should only be taught with detailed instructions. E-collars are controversial, but when used correctly, it’s great for allowing your dog to have off-leash experiences. Great for advancing to advance commands, sports training, and eliminating dangerous behaviors.
Deep Dive into Prong Collars and E-collars:
The tension created around the neck is “global”; it is applied evenly around the neck. This means we can use much less pressure to communicate what we need from the dog. To do this, we spend hundreds of repetitions teaching them that any tension on the leash means to come back to me and sit down next to me.
Prong-Collar
Training with a prong collar results in efficient and safe walks. That doesn’t mean anyone can put one on a dog and get what they want. It takes a lot of communication and training to have them be what they are meant to be: a safe and efficient way to communicate with your dog.
When used correctly prong collars are safer than flat collars and choke chains, they have a much better success rate than harnesses at creating a stress-free walk. The purpose of a prong collar is to help you communicate with your dog without having to use much force. It should fit snug up high behind the ears. The higher you have, the more control you have, and the less power the dog has as if it pulls.
When starting with a prong collar, refer to Part 2 of the walking resource page on the K9 playbook. Take your time in introducing these cues when first starting out, this will motivate your dog to expect good things to come when you put on this collar.
Tips for using a Prong Collar:
- The Herm Sprenger prong collar is the only brand to use; all the others are made with cheap materials that can hurt your dog.
- The 2.25mm size will cover almost any dog; you must add more links for larger dogs.
- The 3.0mm size is used for larger dogs or dogs with longer hair.
- Connect the leash to the D-ring (swivel).
- The circle ring on the chain can attach a carabiner to the prong and flat collar for safety.
- When in motion, the chain should face up or on the handler’s side.
- To put it on or off, take off the links closest to the chain.
- Please take your time to use this tool appropriately; the more gentle your approach is with it, the less pressure you’ll have to guide/correct your dog.
E-Collar Training
After we have taught that any tension on a prong collar means to fulfill the request (commands), we layer the E-collar “working level” (lowest setting) stimulations at the same time that we apply the leash tension. This teaches your dog that you have the same level of communication with an E-collar as you would with a leash.
The benefit of the e-collar is that it can be used for both directions with commands and corrections from any distance. I first layer existing commands onto an E-collar. Remember that a dog has previously done successful repetitions of commands before using the E-collar with that command.
Having a tool like this between us means we have clearer communication, consequences, and playtime around things that were once not possible. Adding tools with your dog should be like utilizing footwear. You first learn to walk barefoot; Once you learn to run and jump, you get to choose the tools that will best suit your environment and lifestyle needs.
The video above covers:
Why I use e-collars:
- Off-leash Freedom
- Speak to the dog through pressure first, then move to mobile “wireless” (leash-less)
Minimum reason to do it:
- Recall, with out a way to get your dog to come to you, you got no dog. It is the most important behaviors to teach a dog with or without an e-collar.
Definitions of my terminology:
- Punishment is when something uncomfortable has quickly been added after an unwanted behavior/action/loading/reactivity has occurred, aiming to avoid it from happening again.
- Correction- is when you aim to prevent unwanted mindsets/behaviors/actions/ loading from happening, typically avoiding escalation or wrong action—Ex. Blocking, physical redirection, or leash tension.
Placement:
- Proper Place neck
- What order to place them on the dog’s neck if you also have a prong on the dog?
Leash communication first:
- Leash use- Tap-taps (engagement), Tension (come to me), Pressure (correction), Pops (punishment)
- Having a happy and relaxed dog
- An e-collar stimulation is foreign
- Aim to make sure that it is loved and understood first through positive reinforcement
- Leash guidance is a must before going off-leash
Low-level layering-
- Finding the Lowest number. SAME FOR A DEAF DOG
- Use stimulation, not vibration
- How do you introduce it?
- Tap tap vs. Continues reflects on Leash pressure
- NUMBERS- Don’t get stuck on them
Q and A :
“Is there a specific age you should introduce it at?”
“When to use e-collar to interrupt hyper-focus before reacting, boost vs. conditioning to the point where only low level needed ?”
“E collars and reactivity?”
“I’m interested in understanding how impulse control/prey drive plays into E-collar training. Do you use the collar as a correction at times? Do you teach impulse control at the same time, before, or is it all part of the process?”
“How to use e-collar when dog walking to heel to encourage follower mindset?
“Thoughts on weaning off e-collar eventually?”
POST LINKS AT BOTTOM FROM ORIGINAL – all of the page videos except Lava.
Recommended Books and Blogs for E-collar Training.
- There are many behavioral trainers with different approaches.
- Everything You Need to Know about E Collar Training by Larry Krohn
- The Art of Training Your Dog: How to Gently Teach Good Behavior Using an E-Collar- by Marc Goldberg
- Simple explanation: Bird Dog Boot Camp: Proper E-Collar Introduction
- Robin MacFarlane is a great companion pet dog trainer that I like. She uses a different brand of e-collar but has a great blog with videos.
Conclusion:
With the right tools and a little bit of patience, you can train your dog to do just about anything! We hope this article has helped provide you with some resources for getting started. Remember to be patient, and keep rewarding your dog for good behavior. Soon enough, you will have a well-behaved, happy and obedient dog. Thanks for reading!

